A Free Powerful Server
4 CPU’s | 24 GB of Memory

Oracle Cloud is the best solution for you if you want a very powerful server without the charges!
I’ve experimented with numerous cloud computing platforms over the last few years, including Amazon Web Services, Microsoft Azure, and Google Cloud Platform. Even while they provide free alternatives, their always-free offer has certain restrictions: low-spec VMs and higher-tier units may only be utilized for a short period or until your credit runs out. In addition, the expense of follow-up is substantial.
I just got the opportunity to test Oracle Cloud and discovered that their “Always Free” VPS is really powerful, with four CPUs and 24 GB of RAM. Furthermore, it is completely free!
Step 1: Make a Account
Simply go to https://signup.cloud.oracle.com/ and complete the process. Although you must enter your credit card information, this is only for verification purposes, and you will not be charged when utilizing Always Free services.
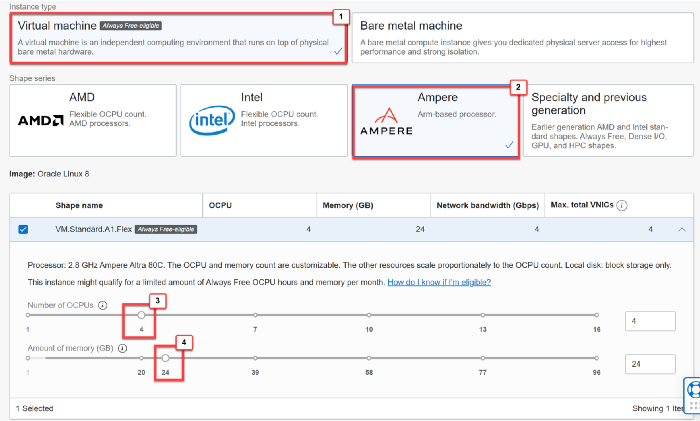
Step 2: Make a Virtual Machine, (aka VM)

Click “Create a VM instance” after logging into your account, as shown. All tenancies get the first 3,000 OCPU hours and 18,000 GB hours per month for VM instances running the VM for free, according to Oracle. Standard. A1.Flex is a flexible form with an Arm CPU. This equates to 4 OCPUs and 24 GB of RAM for Always Free tenancy. So, to get the most out of the “Always Free” service, configure the Shape as follows:
You may build your own SSH key using PuTTy or use the Oracle-generated one; remember to preserve the SSH key since you’ll need it to connect to your server remotely.
You can use 200 GB as the Boot Volume because that is the maximum size you can utilize as an Always Free tier:

Step 3: Connect to the Machine
You may login to your VM through SSH using user “opc” and the private key you obtained in the previous step. To SSH to the server, you can use PuTTy/ MobaXTerm/ OpenSSH in Windows or Terminal in Mac/Linux. After you’ve logged in, run “sudo -i; yum update -y”; to update all of your machine’s software.

There you go! Your brand new server!
More content at PlainEnglish.io. Sign up for our free weekly newsletter. Follow us on Twitter and LinkedIn. Check out our Community Discord and join our Talent Collective.